A Guide to Producing Print Ready Files
Guide to Setting up your artwork
Since its establishment in 1840, traditional values of customer service, quality, range of product and competitive prices have always been paramount to Barnwell Print.
To maintain these values and cope with a fast turnaround times, we require files supplied to be set up correctly (Print Ready). Please ensure your work has been thoroughly proof read before supplying to Barnwell’s, were ever possible please supply a laser proof for us to check against. We would recommend having a colour calibrated hi-res proof if your budget allows if not we strongly advise printing off a laser proof at your end as proof reading on screen is difficult to do.
Barnwell Print operates on a completely digital workflow, from supplied files to our state of the art CTP (computer to plate) system. All jobs for print should be supplied electronically, either on a memory stick or via WeTransfer, Dropbox etc. The preferred file format for this is a PDF (Portable Document Format).
You can also download our Indesign and Quark PDF settings or contact us.
Anything which is not completely correct can always be amended by us (We can sometimes make minor changes to PDF files), but this will take extra time and additional costs may be incurred.
Software
We can accept files produced on MAC and Windows PC versions of industry standard applications. (Indesign, Quark, Illustrator, Word etc)
Page Make-up
– Use the correct page size in the application for your specific requirements.
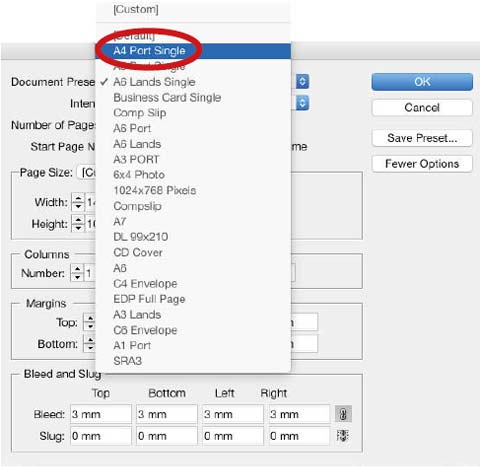
Allow for 3mm bleed in the document and in the print options, this assists finishing. So for an A4 page (210mm x 297mm) please set with 3mm bleed (216mm x 303mm).
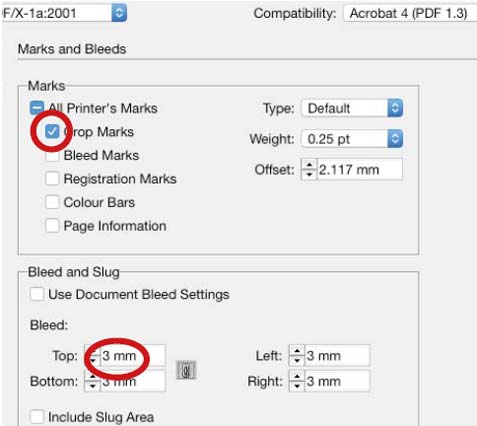
– Incorporating crop marks may require a larger page size on output. Crop marks are not usually necessary but are helpful.
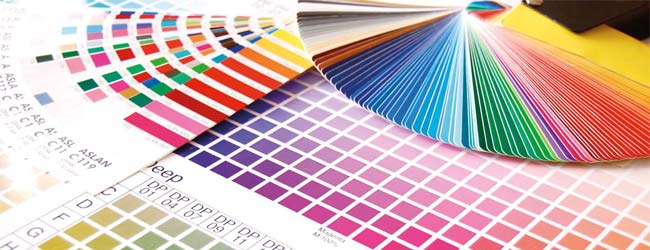
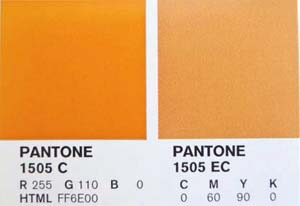
– Please indicate if your job prints in 4 colours (CMYK) or if special (Pantone) colours are used, supplying any Pantone reference numbers used in your job.
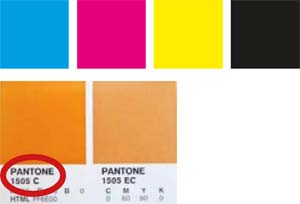
– The colours produced on your monitor or colour printer can differ radically from Barnwells’ calibrated monitors and proofs. A Pantone Bridge book is helpful in choosing colours and we will be happy to supply you with the Bridge Pantone conversion figures. Please inform us of any Pantone numbers used and their CMYK values. This is particularly relevant when colour matching is required.
Printing Pantone Colours or CMYK
When converted to CMYK, colours do not always exactly match the Pantone equivalent. If your required colours are critical it is recommended that these are run as Pantone spot colours and not in CMYK. You will need to discuss cost implications with us if this is the case. Please note that all colours reproduce differently depending on stock used, eg coated, uncoated. Please contact Paul Foster or Richard Pryor with any queries you have regarding any of the above.
Converting Pantone Colours to CMYK
Please be aware that every program, and version of program, has differing Pantone conversion values. We always refer to Pantone Bridge, this is an industry standard Pantone to CMYK colour conversion reference guide. So when designing your job please call us for the correct CMYK colour splits as coated and uncoated values differ.

As you can see demonstrated above the differences in colour splits this is why we work to industry standard specifications to obtain the best results.
Converting Pantone Colours to CMYK in QuarkXpress and Indesign
QuarkXpress:
– Converting Pantone colours to CMYK in QuarkXpress is a two step process. Edit > Colours
– Click on the Pantone colour and edit. Model to CMYK, untick spot colour. You will then have the CMYK values on the right hand side. Input your Bridge CMYK values.
InDesign:
– Swatches > click on swatch created > swatch options (via the arrow on the palette)
– Change the colour to process and CMYK. Input your Bridge CMYK values.
Printing Solid Colours on Coated Stocks
If you require a rich four colour black, we recommend these values:
C63% M52% Y51% K100%. (330% Total Area Coverage – TAC) for Coated stocks (however do not exceed these values, black text must remain 100% black only). If RGB black has been used we will need to convert your artwork to four colour CMYK. We can adjust these colours for you, however this will incur an extra art working charge. It is always recommended to use a lamination where large areas of solid colours are used on covers or folders. Please contact us for a quotation.
Printing Solid Colours on Uncoated Stocks
If you require a rich four colour black, we recommend these values:
C63% M52% Y51% K100%. (300% Total Area Coverage – TAC) for Uncoated stocks (however do not exceed these values, black text must remain 100% black only).
Under Colour Removal
Under colour removal (UCR) is a way of eliminating amounts of yellow, magenta, and cyan that would have added to a dark neutral (black) and replacing them with black ink during the colour separation process. When ripping (processing for print) your files, our system will automatically apply UCR if your artwork exceeds 330% Total Area Coverage – TAC for Coated stocks or
300% Total Area Coverage – TAC for Uncoated stocks.
Fonts
Fonts can be a major contributor to print problems.
– Variations in type design or font substitution can compromise the printed results. For example, the most common typeface ‘Times’ is available in a variety of versions: Times New Roman, Times, and Times Roman, to name a few of the most frequently used. Each differs slightly in design and kerning or tracking values are different.
– Some page layout applications allow a font to be styled from the formatting menu or measurement palette. This should be avoided as the program can create an artificial style which may look correct on screen but will not output correctly because there is no equivalent printer font available.
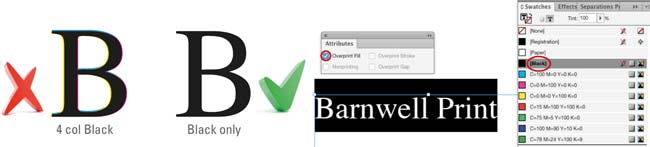
Ensure all Black text overprints and coloured 100% Black only, producing text that is uneditable or 4col Black will cause fit problems on the press and result in the text looking emboldened or out of fit.
– Producing a PDF will help you preview your file and ensure everything is correct before we receive your artwork, ie some fonts have licencing restrictions so are unable to be embedded (solution outline the text). We however would always recommend a hard copy proof there is no better way of checking!
– If you are supplying the open files instead of a press ready pdf remember to save your work and then package/collect for output remembering to tick collect all fonts. See File Submission.
Images
– Ensure EPS, Vector graphics have outlined fonts, this avoids any font problems.
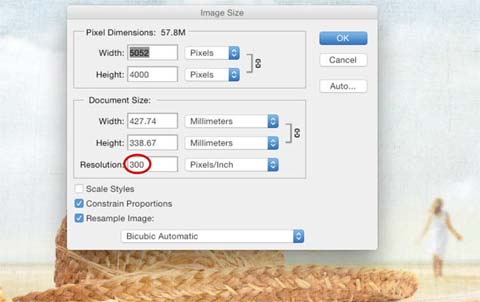
– An ideal resolution of 300dpi (at the size the image is to be used) is recommended, however we appreciate this is not always possible, but we do strive for the best possible result.
All images should be supplied in either TIFF, JPEG, PSD or EPS formats.
If supplying JPEG images save at maximum quality, file sizes vary but are normally 2mbs anything less then please double check your images.
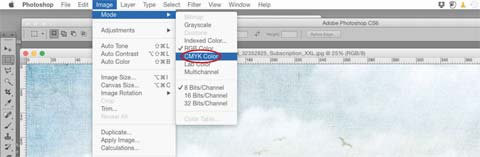
Supply colour images saved as CMYK, not RGB or LAB formats.
Avoid using images saved from the web, these are generally INDEXED colour, RGB or PNG formats and are unsuitable for print, we do how ever have access to an amazing royalty free image library, prices can be supplied on request.
Cutters, Spot UV, Embossing and Foiling
Please set up Cutters, Spot UV, Embossing and Foil masks as a solid 100% spot colour. Set these to ‘Overprint’ and Place these items in position on the printed document on a separate layer. (this assists in exporting for external finishing).
Please title items as follows: – Cutter guide – Spot UV – Embossing – Foiling
Imposition
All jobs are imposed in our dedicated workflow software. For this reason, we ask that you make up and supply your documents as single pages which follow in running order and not as designers’ pairs, printers’ pairs, readers’ spreads or imposed flats.

File Submission
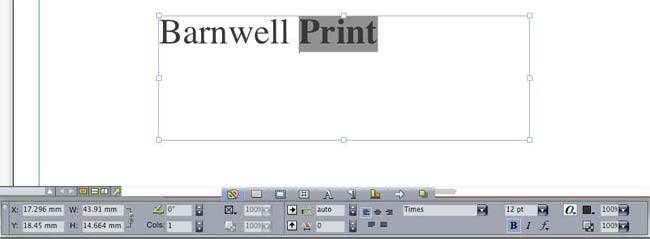
If it is necessary to submit native files rather than Print Ready PDF files, make sure all items used to create the documents are supplied, e.g. fonts, images, logos. InDesign and QuarkXpress have their own ‘collect for output’ tool. as illustrated below

For data security always keep copies of all elements of your artwork.
Files can be submitted on all recognised storage devices or sent via a third party data transfer site eg: Wetransfer, Dropbox etc.
If you wish to email us your files please send them to mail@barnwellprint.co.uk and ensure they do not exceed 10mb.
Please note that PDF files cannot be easily corrected by Barnwell’s. If you resupply amended PDF’s we can re-process your artwork and send you a RIPPED pdf proof for approval. RIPPED PDF’s have been through our system and maintain all data integrity. If however you require an additional hi-res Epson proof this will incur an additional charge.
The Most Common Problems
No bleeds (we require at least 3mm).
Ensure all Black text overprints and coloured 100% Black only, producing text that is uneditable or 4col Black will cause fit problems on the press and result in the text looking emboldened or out of fit.
Some page layout applications allow a font to be styled from the formatting menu or measurement palette. This should be avoided as the program can create an artificial style which may look correct on screen but will not output correctly because there is no equivalent printer font available..
Low resolution images, an ideal resolution of 300dpi (at the size the image is to be used) however we appreciate this is not always possible.
Image files being supplied in RGB format.
Pages sent as designers’ pairs, printers’ pairs, readers’ spreads or imposed flats. These should be sent as single pages and all within the same document.
Jobs in Indesign or Quark that have not been “Collected for Output” correctly.

…Finally
Always send clear written instructions along with your own final proof for us to check against. We strongly advise printing off a laser proof at your end of the RIPPED PDF, as proof reading on screen is difficult to do, before approving your job to print. Remember, in the absence of a proof we can only print what we assume to be the correct version.
Download application PDF presets
Don’t feel like a fish out of water! This guide is intended to help you and save you money, if there is anything within it that you do not understand please pick up the phone we are always happy to help!